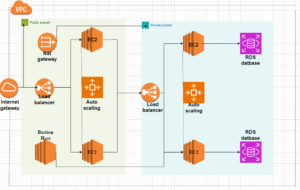
A three-tier architecture is a software design pattern that organizes an application into three distinct layers: the web interface or presentation layer, the business logic layer, and the database layer. This approach is commonly used in client-server applications, including web applications, where the frontend, backend, and database are each represented by a separate tier.
The Layers are;
Presentation Layer: This is the user-facing layer, where the application’s user interface and user interactions occur. It is responsible for presenting data to users and capturing their inputs. In a web application, this is typically the front-end or user interface.
Business Logic Layer: This tier handles the core business logic, rules, and workflows of the application. It processes requests from the presentation layer and interacts with the data storage layer to retrieve or store information. This is often the backend in a web application.
Database Layer: This layer is responsible for storing and managing the application’s data, usually in a database or another form of persistent storage. It provides an interface for the business logic layer to interact with stored data.
Why Separate the Layers
Separating these layers offers several benefits:
Modularity: Each layer can be developed and managed independently, promoting modularity. This allows teams to work on different parts of the application without affecting others.
Scalability: Since the layers are independent, you can scale each tier separately based on demand. For example, you can add more frontend servers without touching the backend or database.
Maintainability: Separation of concerns allows for easier maintenance and updates. Bugs and issues can be resolved within a specific tier without affecting the entire application.
Security: Security can be implemented at each layer, allowing for more targeted security measures. The database layer can have strict access controls, and the presentation layer cannot communicate directly with the database layer hence certain kinds of malicious attacks can be avoided.
Flexibility: Different technologies can be used for each layer. This flexibility allows developers to choose the best technology for each task without being constrained by a monolithic architecture.
This three-tier architecture represents a shift from monolithic applications, where frontend, backend, and data storage are tightly coupled in a single codebase. By separating the layers, you can achieve a more robust, scalable, and maintainable application structure.
Prerequisites
- An AWS account
- Familiarity with the AWS management console
- Knowledge of VPC, subnet, security group, NAT gateway, auto-scaling group.
Let’s Begin
Set up the VPC
A VPC (Virtual Private Cloud) is a virtual network where you create, group and manage your AWS resources. You can create more than one VPC for your account and use it to group certain resources together.
- Go to your VPC dashboard
- Create a VPC and give it a CIDR block of 10.0.0.0/16
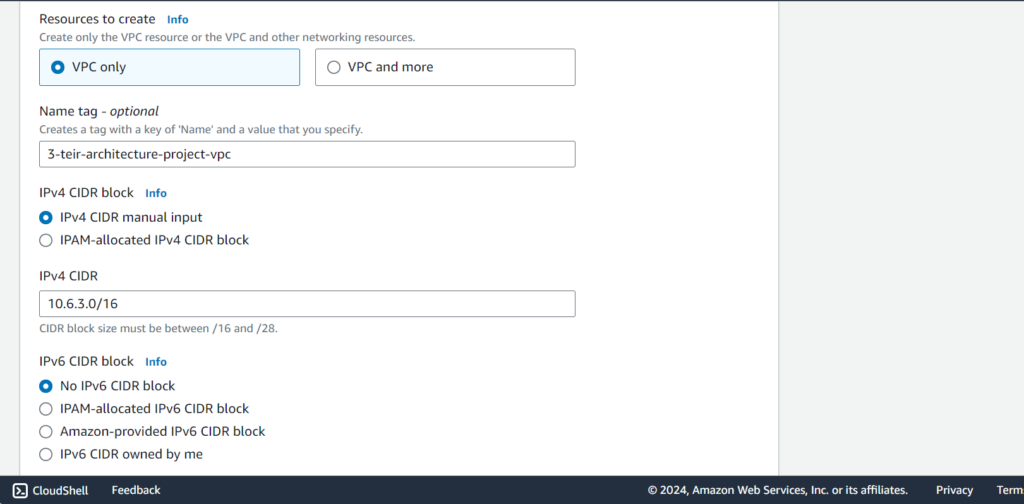
Set up an internet gateway
The Internet gateway enables communication between the VPC and the Internet, it is the entry point for data coming from the Internet into your VPC.
- Select internet gateway from the options at the left of the VPC page
- Create the internet gateway and attach it to the VPC you just created


Create six subnets
Subnets are a way to group resources according to their IP range. Subnets have two major types public and private. Private subnets require a NAT gateway for it to have access to the internet while public subnets do not.
- Select subnet from the options on the left of the VPC page
- Create the following subnet connected to the VPC you created earlier (your working VPC)
Public-subnet-1 | 10.10.1.0/24
Public-subnet-2 | 10.10.2.0/24
Private-subnet-3 | 10.10.3.0/24
Private-subnet-4 | 10.10.4.0/24
Private-subnet-5 | 10.10.5.0/24
Private-subnet-6 | 10.10.6.0/24


Also, put your subnet into separate availability zones, I used eu-west-1, eu-west-2, and eu-west-3 for mine but you can use any other region for yours just ensure you use multiple availability zones.
Create two route tables
Route tables determine how data moves within your VPC. We are creating one route table for the private subnets to route traffic to the NAT gateway and the public subnet to route traffic to the internet gateway.
The route table for the public subnet is given below, it simply routes traffic to the Internet gateway
The route table for the private subnet is shown below, it simply routes traffic to the NAT gateway which will be created next.

Remember to associate your route table with the appropriate subnet. Select the route table, and select Subnet Association below.
Create NAT gateway
Nat is a technology used to allow internet access to private subnets. Its main function is to carry out private IP address translation to public IP address and vice versa. The NAT Gateway is an AWS-managed service for the NAT instance.
- Select NAT gateway from the options at the left of the VPC page.
- Create the NAT gateway, select the ID of your public subnet for the subnet of the NAT gateway when creating it.

We have completed the VPC, subnet, and NAT gateway, these are like the fabric of the architecture, and now we need to create the tiers or layers.
Presentation Layer (Tier 1)
The resources used in the presentation layer are Load balancers, an auto-scaling group, and webservers. Let’s create the webserver first.
Webservers
Webservers are EC2 instances that generate a response to the user accessing the interface, it could be an HTML page.


We need to create a web server template for the auto-scaling group to use to provision web servers when demand goes high.
- Select templates from the options on the left options of the EC2 page
- Select launch templates, and choose the Amazon Linux 2 base image.
- Create a key pair for this template as it will be used to access the instance remotely.
- Create a security group that allows HTTP, HTTPS, and SSH traffic to the instance.
- Scroll below the advance section, and copy and paste the script below to the launch script section.
#!/bin/bash
yum update -y
yum install -y httpd
systemctl start httpd
systemctl enable httpd
The bash script above will be executed when the instance starts.
Create Auto Scaling group
Auto Scaling groups are AWS resources that dynamically adjust the number of Amazon Elastic Compute Cloud (EC2) instances in response to changes in workload demand. They monitor the performance of your EC2 instances based on defined metrics, such as CPU utilization, network traffic, or custom metrics
- On the EC2 page, select autoscaling from the left options
- Select Create an auto-scaling group
- Ensure you select the working VPC and the two public subnets.
- While creating the auto-scaling group you can also create the first application load balancer alongside.


An Application Load Balancer is an AWS service that distributes incoming application traffic across multiple Amazon EC2 instances, ensuring high availability, fault tolerance, and even distribution of workloads among healthy targets.


Ensure that the appropriate subnets are selected which are the public subnets. The ALB needs to listen over HTTP on port 80 and a target group that routes to our EC2 instances.
- Back to the Autoscaling group, select the desired size to be 2, and select the max and min number of instances according to your application, I used 1 and 3 respectively.
- Set up the EC2 instance type to be T2micro so that you take advantage of the free tier.
When you are done, review the settings and click Create. You should see two EC2 instances that have been created on the EC2 instance page.
Confirm that your presentation layer is working appropriately, select load balancer at the EC2 page left options. Locate the application load balancer you created while creating the autoscaling group, copy the DNS name or link of the ALB (Application Load Balancer), and open it on a new browser tab, you should see a web page show up, that means your presentation layer is working.

We also want to SSH our EC2 instance webservers. We should just test SSH to one of the instances.
Follow this article to learn to create to EC2 instance through SSH https://www.digitalspeed.online/all-articles/how-to-connect-to-your-aws-ec2-linux-instance-try-out-various-ways/
Business Logic Layer (Tier 2)
We still need to create a launch template, autoscaling group, load balancer, and bastion host for the business logic layer.
Actually, the bastion host is needed so we can securely connect to our tier 2-layer EC2 instances.
Create the logic server launch template
The major change in this template is the security group.
- Locate and click Create launch template as previously carried out.
- Ensure that the template uses the private subnet
- Create a new security group that allows only ICMP traffic from the web server security group.
- On the advance tab, put in the bash script below.
Create the logic layer ASG
- Create the ASG for the business layer following the method given previously
- Ensure that the appropriate VPC and two private subnets are selected.
- Ensure that the EC2 instance is chosen to be t2.micro instance, free tier eligible.
Create ALB for the business logic layer, and create a new target group.
After creating these, confirm success, go to the ALB, ASG, and EC2 instance pages, and confirm the resources have been created.
Confirm connectivity between the presentation layer and the business logic layer. Connect to your webserver instance through SSH. While connected to your web server instance, ping your logic layer instance using ping –c 3 ec2-private-ip-address

See the ping statistics to confirm that the majority of data was responded to, if that’s the case then your presentation layer is connected properly to the logic layer.
Create the bastion host
- Locate the EC2 console
- Create a new instance using the Amazon Linux 2 base image
- Create a new security group that allows only SSH through my IP
- Create the instance, and ensure it uses the T2micro instance type
Edit the security group of the logic server to allow SSH traffic from the bastion host server security group.

Confirm connectivity from the bastion host server to the logic layer server, this time we need to SSH into the bastion host and then SSH into the logic layer server from the bastion host.

This is a little more complex to do because you will need the key pair .pem file for your logic server to be in the bastion host.
I explain in more detail about connecting to a private server from a Bastion host in this article https://www.digitalspeed.online/all-articles/how-to-connect-to-a-secure-server-private-from-a-bastion-host/
We have successfully connected to the logic layer server from the bastion host, you can confirm it that the host address of the instance we are accessing has now changed to the private address of the logic layer instance.
Database layer (Tier 3)
For this layer, we need to create a security group, subnet group, and RDS instance.
Create a security group
Create a security group that allows traffic from the security group of the logic layer server. You need to modify the inbound and outbound rules.


You should also modify the security group of the logic layer server to allow traffic from the database security group into it.

Create the subnet group
- In the RDS console navigate to “Subnet groups”, and create a new database subnet group.
- Ensure that the appropriate VPC is selected. Select the remaining two private subnets (the previous two private subnets have been used for the application tier).

Create the RDS database
- Click the databases page, select MYSQL from the options
- Select standard create and free tier as shown below
- Follow the screenshot below
- Select our working VPC, select the security group we created above for the database
- Review your settings and click Create Database


You are now ready to connect to your database from your logic layer servers and copy the database connection string or DB endpoint.
SSH into the logic layer server from the bastion host, run the command below
mysql -h YOUR-DB-ENDPOINT -P 3306 -u DB_USERNAME –pEnter the password created when creating the database.

You should see your session command input line change from an IP address to mysql>
You have successfully connected to your MYSQL database, any query you type right now would run on your database.
If you had issues connecting to the MySQL database, it’s because the MySQL client is not installed on your instance, I had this issue too and I have written an article on how to resolve this issue https://www.digitalspeed.online/all-articles/how-to-install-mysql-cli-on-your-aws-ec2-instance/
I would like to congratulate you for making it to the end, take some time to appreciate what you just did. Now I would advise that you stop and delete all the resources you used and created so you don’t get charged any more than needed.


Here’s a list of resources to watch out for and delete:
Delete RDS database
Delete Bastion host
Delete the two application load balancers
Delete the two auto-scaling group
Delete the four EC2 instances for the logic layer and webserver
Delete the instance template
Delete the Nat gateway
Delete the Internet gateway
Delete the 6 subnets and VPC
Why carrying out my own design and implementation, I learned form this source below;
How to Design a Three-Tier Architecture in AWS | | Andela
Conclusion
You have successfully created a three-tier application architecture on AWS services.
Share your comments with us, what difficulty did you encounter why attempting this

