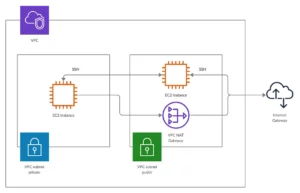
Connecting to a secure virtual server from a bastion host offers enhanced security by limiting direct access to the private server. Utilizing a bastion host acts as a gateway, providing controlled access to the private server, thus reducing the attack surface.
This method strengthens network security protocols and prevents unauthorized access to critical infrastructure, ensuring safer and more controlled server management but the security of your architecture can be impacted by how you manage the connection keypair. I’ll demonstrate various methods of handling security keys and evaluate their effectiveness to ensure optimal security measures are in place.
Before we start, I would like to clear some terms here,
A secure virtual server typically resides in a private subnet, which means it is not directly accessible from the internet. It has a private IP address which it uses for internal communication but not a public IP address.
A bastion host is a secure computer on a network that acts as a gateway for access to other private servers. It serves as a single point of entry, helping to protect internal systems from unauthorized access.
In most cases, the bastion host only allows access from the user IP address and that’s what we will implement here.
Implement the network from the architecture
We would be using AWS but you can use Azure, GCP, or any other cloud provider. I wouldn’t go into much detail on implementing the network but I will link resources below for you to get more clarifications on this part;
Connecting to an ec2 instance in a private subnet on AWS | by Harry Daniels | Towards Data Science
Create your VPC, internet gateway, NAT gateway, private and public subnet
A VPC (Virtual Private Cloud) is a virtual network where you create, group, and manage your AWS resources. You can create more than one VPC for your account and use it to group certain resources together.
- Go to your VPC dashboard
- Create a VPC and give it a CIDR block of 10.10.0.0/16
The Internet gateway enables communication between the VPC and the Internet, it is the entry point for data coming from the Internet into the VPC.
- Select internet gateway from the options at the left of the VPC page
- Create the internet gateway and attach it to the VPC you just created
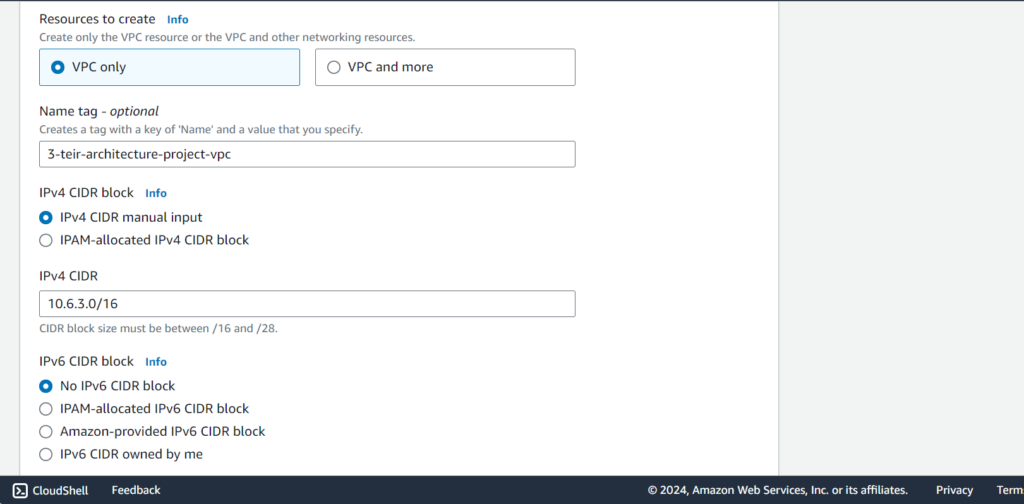

Subnets are a way to group resources according to their IP range. Subnets have two major types of public and private. Private subnets require a NAT gateway for it to have access to the internet while public subnets do not.
- Select subnet from the options on the left of the VPC page
- Create the following subnet connected to the VPC you created earlier (your working VPC)
Private-subnet | 10.10.2.0/24
Public-subnet | 10.10.1.0/24
In practice, you should create multiple private and public subnets and put them in different availability zones for resiliency.
Route tables determine how data moves within your VPC. We are creating one route table for the private subnets to route traffic to the NAT gateway and the public subnet to route traffic to the internet gateway.
The route table for the public subnet is given below, it simply routes traffic to the Internet gateway
The route table for the private subnet is shown below, it simply routes traffic to the NAT gateway which will be created next.


Remember to associate your route table to the appropriate subnet. Select the route table, select Subnet Association below.
Nat is a technology used to allow internet access to private subnets. Its main function is to carry out private IP address translation to public IP address and vice versa. The NAT Gateway is an AWS-managed service for the NAT instance.
- Select NAT gateway from the options at the left of the VPC page.
- Create the NAT gateway, select the ID of your public subnet for the subnet of the NAT gateway when creating it.
We have completed the VPC, subnet, and NAT gateway.

Create EC2 instance for bastion host
Create an EC2 instance in the public subnet, and allow only SSH connection to the instance from your IP address.
- Locate the EC2 instance page, select instances, and click Create instance
- Use any of the base images, use the t2micro instance type, use a new key pair .pem file, or create a new one
- For VPC select your working VPC, select the public subnet
- Select Create a new security group, and add a rule that allows only SSH from your IP address as shown in the screenshot below.
- Create the instance
Create EC2 instance for secure server
Create an EC2 instance in the private subnet, and create its security group to allow only SSH connection from the security group of the bastion host instance.
- Locate the EC2 instance page, select instances, and click Create instance
- Use any of the base images, use the t2micro instance type, use the same key pair .pem file as used with the bastion host
- For VPC select your working VPC, select the private subnet
- Select Create a new security group, and add a rule that allows only SSH from the security group of the bastion host as shown in the screenshot below.
- Create the instance
After creating the architecture, you need to connect to your bastion host then to your private instance, here are the ways you can do it;
Connect to your private instance through agent forwarding
Connect to your bastion host from your local computer through SSH but first you have to configure agent forwarding.

ssh-agent bash
ssh-add keypair.pem
ssh-add -1
The command above adds the keypair file to the chain so you can use it connect to both your bastion host and then to your private server. Replace keypair with the actual directory to your keypair i.e ./keypair.pem
Use the command below to connect
ssh –A ec2-user@BASTION-HOST-IPReplace BASTION-HOST-IP with the actual IP of your bastion host. When you are connected, use the similar command below to connect to your private server.
ssh ec2-user@PRIVATE-SERVER-IP You should be connected now to the private server, confirm that the IP on the hostname is same as the private server IP.
Check out this video for more info https://www.youtube.com/watch?v=SjvAoL8iiQs
Using SSH Config file
Using an SSH config file simplifies connecting to remote servers by defining connection parameters like host, username, and private key. Instead of typing lengthy commands, users can use custom aliases, improving efficiency and reducing errors. The config file enhances security and streamlines SSH access for frequent connections.
In this case, it further simplifies the process by enabling seamless connectivity between the bastion host and the private server.
Create a .ssh/config file in your root directory.
Copy the data below and paste on the file, make the changes to the actual values you have below;
Host bastion-instance
   HostName <Bastion Public IP>
   User ec2-user

   IdentityFile /path/keypair.pem

Host private-instance
   HostName <Private IP>
   User ec2-user
   ProxyCommand ssh -q -W %h:%p bastion-instance
Use the name you want for bastion-instance and bastion-host
Change the hostname to your instance IP for both the bastion host and the private server
Change the user argument to the your user value; ubuntu, root, bitnami, etc.
Change the the proxy argument bastion-host to your host details actual name
Change the path to file accordinlgy
Run the command to start ssh connection to your private server directlyalthough it passes through the bastion host first has indicated in the config file
ssh private-instnace 
Copy your keypair file directly from your local computer into your bastion host
Unlike the other two methods above, this method is not very secure and is not recommended because if your bastion host is compromised, the hacker can quickly get to your private server because your keypair file is available at the bastion host.
Use the command below to copy the file from your local directory to your bastion host
scp –i ./path/keypair.pem ./path/file-to-copy ec2-user@IP-bastion-HOST:./ It copies the keypair file to your root directory of the bastion host
Connect from the bastion host to your private server
ssh ./path/keypair.pem ec2-user@IP-PRIVATE-SEVRER Check out this article for more about this, How to copy files remotely using SSH (simplified.guide)
Upload your keypair file to a private S3 bucket and download or copy the file from S3 to EC2
This method is also not very secure and is not recommended because if your bastion host is compromised, the hacker can quickly get to your private server because your keypair file is available at the bastion host.
To do this you would need to make a private S3 bucket or make the S3 object of the file private so it isn’t accessible to the public internet.
Give your ec2 instance an iam role to access object from s3.
Connect to your EC2 instance through SSH
ssh –i ./path/keypair.pem ec2-user@BASTION-HOST-IP Confirm ec2 can access S3
Copy file from s3 to bastion host using the object S3 URL
aws s3 cp <object S3 URL> ./ I wrote an article about retrieving objects from private S3 buckets to EC2 instances, you can find out more from it https://www.digitalspeed.online/all-articles/how-to-enable-aws-ec2-access-to-your-s3-bucket/
Upload keypair file to public S3 bucket or any other provider where the file can be downloaded from the URL
This a highly insecure way of accessing a private server, actually it defies the aim of making a server private, which for optimal security, with this approach anyone can download your keys if they have the URL, so caution. You could also delete the file from the bucket when you are done.
If you would try this, make sure it’s on a personal project or demonstration where you would delete the resources immediately and not for production.
Connect to your Bastion host remotely
ssh –i ./path/keypair.pem ec2-user@BASTION-HOST-IP You can then download the keypair file to your Bastion host using the command
wget KEYPAIR-URL Your keypair file is downloaded to your root folder, you can confirm with the command ls
You see your keypair file shown in this directory that’s if the download was successful
Connect to your private server
ssh -i ./path/key-pair ec2-user@Private-server-IPConclusion
The first two methods, utilizing SSH agent or SSH config files, are the most secure and recommended approaches as they avoid exposing your keypair file.
Conversely, copying directly from S3 or the local computer is not advisable due to security risks; if a bad actor gains access to the bastion host, they could also access your private server with the keypair file available there.
Remember to delete the resources you have created; delete the EC instances, delete the VPC and subnets, delete the NAT gateway and internet gateway.
The fifth method is only suitable for practice or demonstration purposes.
Share your thoughts below, what difficulty did you face.

